Reference:
http://www.vxav.fr/2016-11-22-import-powercli-6-5-module-and-keep-custom-prompt/
PowerCLI 6.5
Import-Module VMware.VimAutomation.Core
Pre PowerCLI 6.5, just only Add-PSSnapin
Add-PSSnapin VMware.VimAutomation.Core

Reference:
http://www.vxav.fr/2016-11-22-import-powercli-6-5-module-and-keep-custom-prompt/
PowerCLI 6.5
Import-Module VMware.VimAutomation.Core
Pre PowerCLI 6.5, just only Add-PSSnapin
Add-PSSnapin VMware.VimAutomation.Core

Reference:
Prior VSAN 6.6
Step 1 – Deploy a new vCenter Server and create a vSphere Cluster with VSAN Enabled.
Step 2 – Disconnect one of the ESXi hosts from your existing VSAN Cluster and then add that to the VSAN Cluster in your new vCenter Server.
Step 3 – Add the remainder ESXi hosts to the VSAN Cluster in the new vCenter Server.
Step 4 – Re-create each of the VM Storage Policies and re-attach them to the existing Virtual Machines
VSAN 6.6
Step 1 – Deploy a new vCenter Server and create a vSphere Cluster with VSAN Enabled.
Step 2 – Modify the ESXi Advanced Setting
Foreach ($vmhost in (Get-Cluster -Name VSAN-Cluster | Get-VMHost))
{
$vmhost | Get-AdvancedSetting -Name "VSAN.IgnoreClusterMemberListUpdates" | Set-AdvancedSetting -Value 1 -Confirm:$false
}
Step 3 – Add the remainder ESXi hosts to the VSAN Cluster in the new vCenter Server.
Step 4 – Revert the ESXi Advanced Setting
Foreach ($vmhost in (Get-Cluster -Name VSAN-Cluster | Get-VMHost))
{
$vmhost | Get-AdvancedSetting -Name "VSAN.IgnoreClusterMemberListUpdates" | Set-AdvancedSetting -Value 0 -Confirm:$false
}
Step 5 – Re-create each of the VM Storage Policies and re-attach them to the existing Virtual Machines
Reference:
Remove the audit.log:
shell.set --enabled true
cd /var/log/audit
rm -rf audit.log
service-control --stop --all
service-control --start --all
Reference:
/usr/lib/vmware-vmafd/bin/vmafd-cli get-ls-location --server-name localhost
Reference:
https://pubs.vmware.com/vsphere-50/index.jsp#com.vmware.vddk.pg.doc_50/vddkDataStruct.5.5.html
Virtual Disk Transport Methods
LAN (NBD) Transport
SAN Transport
HotAdd Transport
Reference:

vmfsSparse
vmfsSparse Snapshot create:
vmfsSparse Snapshot delete:

vmfsSparse Snapshot revert

Reference:
Storage object > VSAN Deduplication

Reference:
cluster object > Manage > Settings > Virtual SAN > General > Edit

Reference:
http://www.yellow-bricks.com/2016/02/10/whats-new-for-virtual-san-6-2/
https://blogs.vmware.com/virtualblocks/2015/08/31/too-soon-nah-vsan-technology-preview/
http://cormachogan.com/2016/02/12/vsan-6-2-part-1-deduplication-and-compression/
Requirements:
VSAN 6.2 or later
All-Flash VSAN
deduplication and compression happens during destaging from the caching tier to the deduplication tier
deduplication granularity is 4KB
Data block will only be stored compressed when it can be compressed down to 2KB or smaller
The domain for deduplication is the disk group in each host

Deduplication on VSAN uses the SHA-1 hashing algorithm, creating a “fingerprint” for every data block. This hashing algorithm ensures that no two blocks of data result in the same hash, so that all blocks of data are uniquely hashed. When a new block arrives in, it is hashed and then compared to the existing table of hashes. If it already exists, then there is no need to store this new block. VSAN simply adds a new reference to it. If it does not already exist, a new hash entry is created and the block is persisted.
Another new space-saving technique in VSAN 6.2 is compression. VSAN uses the LZ4 compression mechanism, and it works on 4KB blocks. If a new block is found to be unique, it also goes through compression. If the LZ4 compression manages to reduce the size of the block to less than or equal to 2KB, then the compressed version of the block is persisted to the capacity tier. If compression cannot reduce the size to less than 2KB, then the full-sized block is persisted. We do it this way (deduplication followed by compression) because if the block already exists, then we don’t have to pay the compression penalty for that block.
Reference:
https://tsmith.co/2014/vsan-overview/
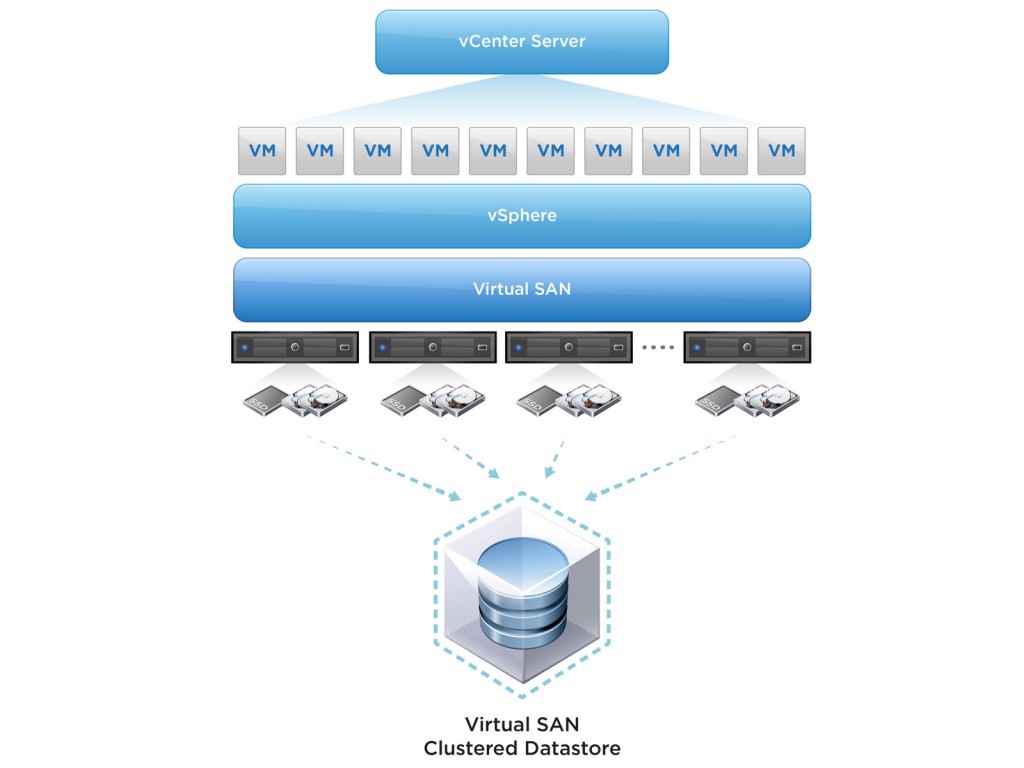
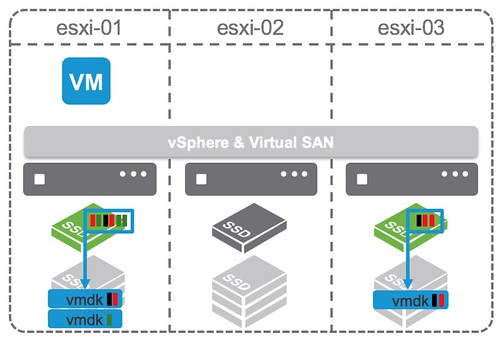
VSAN is a scale out storage solution that utilizes the local storage of the ESXi hosts, and presents a single datastore to the cluster.
Reference:
https://code.vmware.com/web/dp/vmware-virtual-san-poc-guide
https://blogs.vmware.com/virtualblocks/2017/04/11/goodbye-multicast/
vCenter > Hosts & Clusters > Manage > Networking > Virtual adapters

Click on the icon to add a new virtual adapter (VMkernel Network Adapter)
select a distributed port group called VSAN network that has already been created

select Virtual SAN traffic

Remarks:
VMware vSAN in 6.6 will no longer use Multicast. All vSAN traffic will instead use Unicast.
Reference:
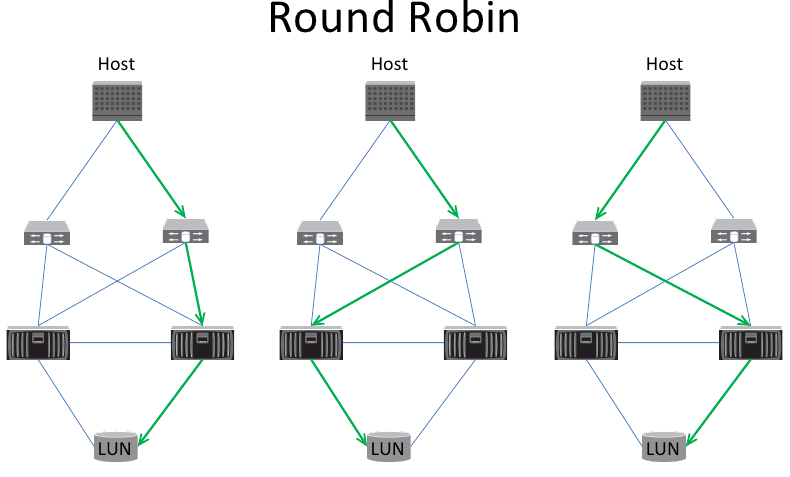
http://theithollow.com/2012/03/08/path-selection-policy-with-alua/
3 Path Selection Policy (PSP)
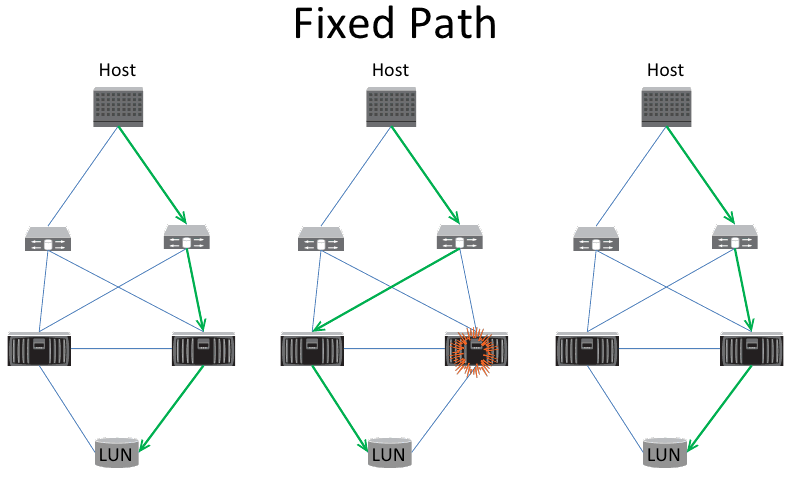
2. Most Recently Used (MRU)

3. Round Robin
Reference:
vmkping x.x.x.x
Reference:
http://www.thomasmaurer.ch/2010/12/powershell-delete-files-older-than/
# Delete all Files in C:\temp older than 30 day(s)
$Path = "C:\temp"
$Daysback = "-30"

$CurrentDate = Get-Date
$DatetoDelete = $CurrentDate.AddDays($Daysback)
Get-ChildItem $Path -Recurse ( | Where-Object { $_.LastWriteTime -lt $DatetoDelete } | Remove-Item
Reference:
Connect-VIServer -Server vcenter01 -User admin -Password pass
Reference:
# Adds the base cmdlets
Add-PSSnapin VMware.VimAutomation.Core
# Add the following if you want to do things with Update Manager
Add-PSSnapin VMware.VumAutomation
Reference:
http://www.vmwarearena.com/vsphere-distributed-switch-part-1/
vSphere Standard Switches (vSS)

vSphere Distributed Switch (vDS)

兩者最大分別就係 vSS 係獨立o係每隻 ESXi, 但 vDS 係由 vcenter 去 deploy 同 configure 去每一隻 ESXi 度, 咁多隻 ESXi 係用緊同一隻 vDS.
Reference:
http://itbundle.net/archives/2035

vmmic 即係 physical 機既 network interface
vNic 即係 VM 既 network interface
將 VM 既 vNic assign 番適當既 portgroup, 部 VM 就 connect 到適當既 network
Reference:
http://up2v.nl/2014/06/12/what-are-the-dangers-of-snapshots-and-how-to-avoid/
https://daemonchild.com/2010/12/15/vsphere-snapshots/
http://blog.dewin.me/2014/05/what-is-buzz-around-backup-from-storage.html
Snapshot create:

Original VMDK 會變成 Read Only
Snapshot Log File 會 create, 個 file size 會每 16 MB 咁 growth.
要留意既係如果 read data 既時候, 有可能要 read 晒 2 個 VMDK, 因為有 data 會o係 original VMDK, 亦有 change 既 data o係 snapshot VMDK 度.
Snapshot Delete:

其實 Delete snapshot, 佢首先會 create 另一個 snapshot, 叫 consolidated helper snapshot, 新 change 會寫落 consolidated helper snapshot, 跟住開始將 snapshot merge 落 original VMDK 度.
正常黎講, consolidated helper snapshot 係會細過普通 snapshot, 不停重覆, 直至細到一個程度 (應該係 16 MB 以內) 就會 freeze VM 做 commit 最後一個 consolidated helper snapshot.
但假如部 VM 好多 write 既動作, 變成 consolidated helper snapshot 永遠都唔會細….咁個 delete snapshot 動作就會做好耐
Reference:
http://www.rockygiglio.com/tech/backups-suck-so-make-them-easy-vmware-vdp/

VDP 其實同 Avamar 係同一樣野….雖則 VMware 同 EMC 都話兩樣野係唔同….
但如果睇番 Technical document, EMC 既 Avatar 同 VMware 既 VDP Appliance, 內裡既 component 係一模一樣….
o係我角度,我會當佢地係同樣既野.
當 VDP / Avamar 夾埋 Data Domain 一齊用既時候, Data Domain 就會係 backup storage media, 而 metadata 就會 store o係 VDP Appliance / Avamar 度.
Reference:
https://itzikr.wordpress.com/2012/07/10/emc-networker-8-is-here/
VMware Consolidated Backup (VCB)

VMware vStorage APIs for Data Protection (VADP)

VM take 左個 snapshot 之後, backup proxy server 會 mount 起 original VMDK 去做 backup.
VADP compare with VCB
|
VMware vSphere Storage APIs – Data Protection
|
VCB
|
|
|
Requires additional download & install
|
No, built into the data protection software
|
Yes
|
|
Full virtual machine image backup
|
Yes, single step copy – source to target
|
Yes, with two step copy – source to VCB proxy and VCB proxy to the target
|
|
Incremental virtual machine image backup
|
Yes – using change block tracking
|
No
|
|
File level backup
|
Yes, both Windows and Linux
|
Yes, Windows only
|
|
Full virtual machine image restore
|
Yes
|
Yes, by using VMware Converter
|
|
Incremental virtual machine image restore
|
Yes
|
No
|
|
File level restore
|
Yes, using restore agents
|
Yes, using restore agents
|
|
CLI for image backup
|
No
|
Yes
|
|
CLI for file backup
|
Yes
|
Yes
|
Reference:

Take 第 1 個 snapshot 時, Original 隻 VMDK (vm-flat.vmdk) 會 mark 做 Read Only, 所有既 delta change 會寫落新既 VMDK (vm-001.vmdk)
Take 第 2 個 snapshot 時, vm-001.vmdk 會 mark 做 Read Only, delta change 就寫落 vm-002.vmdk. 如此類推…
Reference:
http://www.vmwarearena.com/vsphere-6-0-whats-new-in-vmware-fault-tolerance-ft/

5.5 或之前既 FT 只係 support 1 vcpu, 但去到 6.0 FT 已經 support 4 vcpu.
Reference:
https://www.pluralsight.com/blog/it-ops/vmware-fault-tolerance
http://virtualkenneth.com/2010/12/13/design-vmware-ft-network-activeactive-or-activepassive/

VMware Fault Tolerance (FT) 同 HA 最大分別就係如果隻 ESXi host 死左, VM 係可以即時做到 Failover, 冇 down time.

要做到即時 failover, 係因為其實有隻 secondary 既 VM 不停 replicate 緊 primary VM, 令到兩隻 VM sync. 當 detect 到 primary VM failed, secondary VM 就會變成 active.
Reference:
http://www.vmwarearena.com/vmware-interview-questions-svmotion/
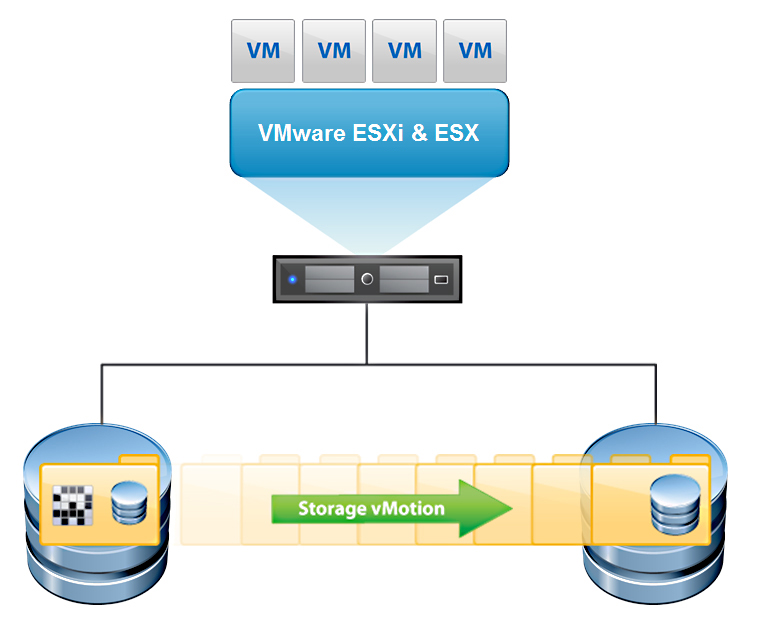
Storage vMotion 就係將 VM 由一隻 datastore migrate 去另一隻 datastore.
Reference:
http://www.hyaking.com/vmotion/

將 VM 由 ESXi host migrate 去另一隻 ESXi host, 就係 VMotion.
值得留意既係最基本既 VMotion, 係需要 shared storage.
Reference:
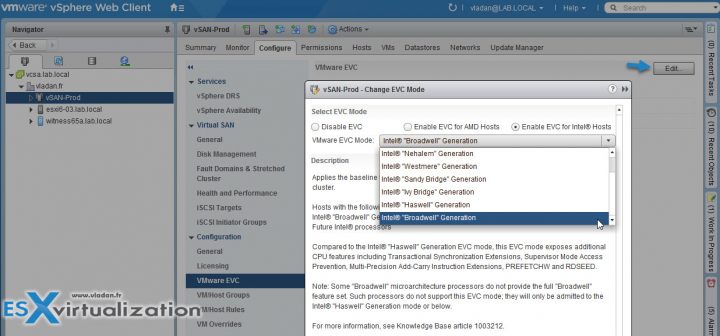
https://www.vladan.fr/what-is-vmware-enhanced-vmotion-compatibility-evc/
http://download.ithome.com.tw/article/index/id/4425
EVC 允許您在不同代 CPU 之間 VMotion
Enhanced VMotion Compatibility(EVC)就是讓虛擬化環境內虛擬機器使用的CPU處理器可以相容的設定,由於虛擬化環境內,每台ESXi主機的CPU處理器不一定完全都一樣,所以當ESXi主機上的虛擬機器要移轉到其他主機上ESXi主機上時,由於CPU不符,就會無法移轉,有了EVC的功能,就可以讓CPU處理器可以在不同型號的CPU處理器相容,不會因為CPU處理器不同而無法移轉。
cluster level > Select the cluster > VMware EVC > Edit > Chose a radio button
Reference:
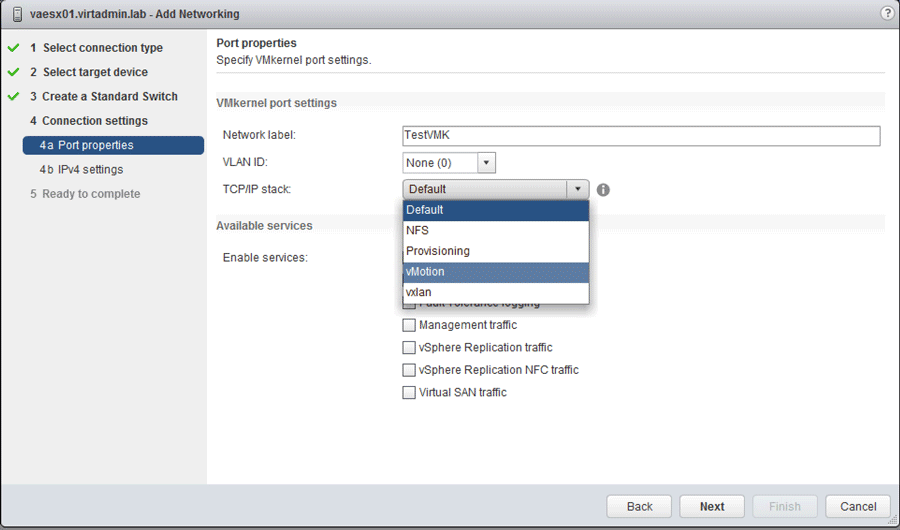
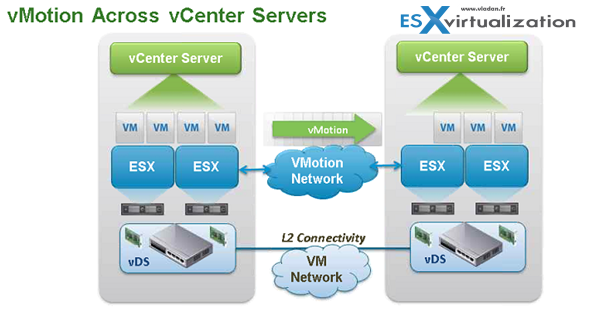
http://www.mindthevirt.com/vmkernel-tcpip-stacks-1080
http://wahlnetwork.com/2016/05/26/vmotion-tcpip-stack-layer-3-vmotion/
3 major TCP/IP stack
One of the primary reasons for creating a separate TCP/IP stack from the default one in many cases is to use a different default gateway
當你需要將 VMware 唔同既 traffic 分開唔同 network 經唔同既 default gateway 走就需要 configure TCP/IP stack
Management traffic between ESXi hosts and vCenter server are considered as the default TCP/IP stack. Also, host related traffic like vMotion, NFS/iSCSI storage, HA and vSphere FT are part of it.
By creating a VMkernel port on the vMotion TCP/IP stack you can isolate vMotion traffic to this stack. By doing so, vMotion traffic will be disabled on the default TCP/IP stack. The vMotion TCP/IP stack is used for live VM migrations.
VMware recommends configuring a separate vMotion TCP/IP stack and isolate management traffic from vMotion traffic.
依個 vMotion TCP/IP stack 係 for Layer 3 vMotion, 原本既 vMotion traffic 只係 Layer 2 only. 要 enable 左 vMotion TCP/IP stack 先可以做到 Layer 3 vMotion.
The provisioning TCP/IP stack is used for cold VM migration, cloning and snapshotting traffic. In case of a long-distance vMotion (new in vSphere 6), NFC (network file copy) traffic can be configured to use the provisioning TCP/IP stack. Setting up a provisioning TCP/IP stack is useful when you want to isolate this traffic from other TCP/IP stacks. A dedicated provisioning TCP/IP stack is common in VDI environments and in setups with frequent VM snapshots.
Reference:
https://www.vladan.fr/vsphere-6-features-long-distance-vmotion/
Requirements:
Reference:
http://www.yellow-bricks.com/2010/07/05/changes-to-snapshot-mechanism-delete-all/
Old situation (pre vSphere 4 Update 2)
vSphere 4 U2 或之前, “Delete All" snapshot 既動作係將 Snapshot 4 加到 Snapshot 3, Snapshot 3 加到 Snapshot 2, Snapshot 2 加到 Snapshot 1, 最後 Snapshot 1 加到 Base disk, 之後就 delete snapshot. 但咁樣做就會用左 Total 61GB 既 Snapshot 同 Base disk o係 Delete All 既過程.
New situation
新既方法,首先會將 Snapshot 1 加到 Base disk, Snapshot 2 加到 Base disk, Snapshot 3 加到 Base disk, Snapshot 4 加到 Base disk. 之後就 Delete snapshot. 最後成個過程都只係用左 28 GB.